redmotion: 2007

02 December 2007

Archtools for XSI


This is a plugin with a number of little tools for modelling with more precision:

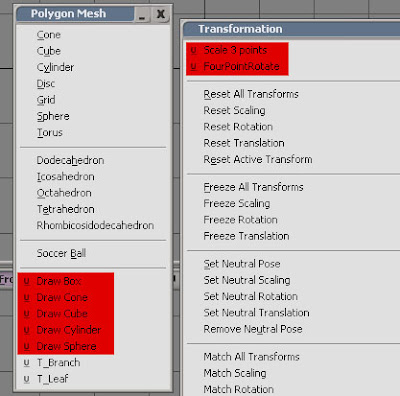
Draw Box, Draw Cone, Draw Cube, Draw Cylinder and Draw Sphere enable the user to pick 2-3 points to define the size, position (and rotation in some cases) of the standard polygon primitives. Draw box requires 3 points (corner point, length, width) , the others two (centrepoint then size).
The two transform tools mimic common cad tools: the 3 point rotate and the 3 point scale.
1. Select an object or or number of them.
(Use CTRL to snap to elements, Left-click to select all points.)
2. Pick the origin about which the scale or rotation will be done.
3. Pick the reference point (usually on the object to be transformed) that will be used for scaling/rotation
4. In the case of the rotation, pick a point which defines the axis of rotation.
5. Finally, pick the new position for the reference point. Right-click to exit when finished.


Click on this thumbnail to see 4 point rotate in action.

EDIT: (link updated. - download and replace file from .txt to .xsiddon) here.

15 November 2007

Black Mesa: Source

At the mo' I'm just pushing forwards with some prop skins for Black Mesa: Source. Thought I'd link to this image at moddb which shows my DNA texture sitting in the foreground.

Rapidcore 001

02 November 2007

Sunpath plugin - alternative download

If you are having trouble getting sunpath plugin to run you can get a non-xsiaddon version from the link below. It also contains instructions on how to install the plugins manually and usage tips.

http://files-upload.com/333993/SunPosition-beta0.2-26-06-07.zip.html

07 September 2007

IES Lights in XSI

This is something I posted at XSIbase on June 8, 2007, I'm putting it here for ease of finding:


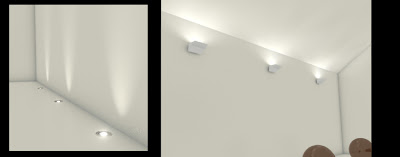
I started playing around with the IES plugin for Softimage XSI from Ctrl studio called ctrl.light profile and wanted to establish a workflow that yealded some good results. (see link to original post for download: http://forums.cgsociety.org/showthread.php?f=24&t=300617&page=1&pp=15)

Anyway, Ctrl.light profile does seem to display a reasonably accurate visual appearence of a luminaire, if used correctly:-

To get a hold on how to use the plugin do the following:-

1. Firstly: find a light fitting that you know about, it helps to have
photographs of it installed and working. I chose some uplighters from Erco;
(Erco are good because provide both 3d meshes and IES data for all their
products as well as comprehensive brochures.)

2. Then: Get > Primitive > Geoshader and add the plugin to the
Geoshader.

3. Import the appropriate IES data into the IES filename section.

4. Create a point light. Important: Reduce the intensity of the point light
you are going to use as an IES to 0
or you will not get a correct result - you'll end up getting light from the pointlight as well as the IES shader (which is extra bad if you are using GI or/and FG.)

5. In the light part of the plugins ppg attach the new point light.

6. Now do a test render of the light positioned near a surface and go
forward from there.

7. Important: DON'T rotate the point light. After all, there is no logical reason to. IES data for an uplighter will automatically cast light upwards, a downlighter will always cast light downwards. Just placing the pointlight above or below a specific light (depending on the type) is all you need to do.


Finally, if you need more than one light of the same type, use Instances. Create a model from the light mesh object (if used), point light and geoshader, then instance them around the scene - Works well.

25 August 2007

3rd place - T-Gen Competition Entry

I was very pleased to get third place with this entry into the T-Gen competition:


20 August 2007

Redmotion XSI plugins - now packaged addons

I've decided to package all my plugins as .xsiaddons. This should now allow them to be installed in a workgroup and easier to uninstall.

2d Dxf importer for XSI v6 - here
(No Change)
3d Dxf importer for XSI v5/6 - here
(No Change)
Sun Position plugin - here
(Now features Primitive > Light > Sun and Property > SunPosition menu items. The Sun primitive features a "distance" parameter for moving the light clear of the scene.)
Four point rotate - here (Post coming soon about how to use this plugin - it's a CAD style precise rotation tool.)

09 August 2007

Something revolutionary is coming!

Softimage have been developing a new extension for their existing software, Softimage XSI. To quote a post (perhaps the most exciting one i've ever read there) at XSIbase :-
(It) will do for particles, custom ops, and tools, etc what the render tree has done for custom look development. That is, open it up to many more people and increase the rate of development.
Basically, it seems as if you will be able to add your own complex features based around existing operations perhaps without any coding experience.

06 August 2007

Entrance Interior


1hr 20mins rendering, FG about 50mins- Mental Ray, Photoshop, Softimage XSI 6.02

29 June 2007

Sun position for XSI 6 - beta

Please download this plugin for XSI 6+ from here.


Read the instructions in the readme file for installation and usage.

Residential Building 1 (reprise)

Yep. Rendered in Mental Ray in just under two hours at 2000 pix wide and tweaked in Photoshop comes my redo of the Residential Building 1 image:

Both images can be found at my portfolio at CGTalk - http://jasonio.cgsociety.org/gallery/

15 June 2007

T-Gen for Softimage XSI - public beta


This is a plug in I've been lucky enough to have been a beta tester on for the last week or two.

What is it? To quote the T-Gen website:

T-Gen is the first tree and plant generator plugin fully integrated into XSI architecture. Over 100 appearance and distribution parameters, full utilization of XSI curves and node-based hierarchy ensures great flexibility and huge possibilities while creating your own trees and plants. You can use almost all XSI tools to additionally edit materials, geometry, hierarchy of all T-Gen objects. With powerful optimization tools you can create low-poly trees and plants for your games. Almost all parameters of T-Gen are animatable, so you can create animations of growing trees and plants.


12 June 2007

Auto-rendermap script (XSI)

Here is a short script for automating the UV-mapping and rendermapping of any polymesh objects you have selected. Change the parts highlighted in red if you want better resolution textures to be generated (eg:512 to 1024). You can also add further rendermap options here like to render illumination only. The line in green is where the UVs are applied. This can be amended to suit various situations.

All rendermaps are automatically saved out to your project/Rendermaps directory.

Once rendermapping is complete, constant shaders are then applied to all the objects and the textures are reattached to the correct objects automatically.

Switch to textured decal in the viewport to see the result.

(Save a copy of the scene before continuing and use at your own risk)

'Make a rendermap on every selected object in scene

'completed between 10 & 11-06-07
'By Jason Wells aka Redmotion

dim name, imfile, oClip

set list = GetValue( "SelectionList" )
if list.count = 0 then
MsgBox "Please select at least one polymesh object first!!"
else

'start rendermap make routine - depending on scene size and object complexity this could take a while... :)
for each item in list
logmessage item.name
name = item.name
if item.type = "polymsh" then
SelectObj name, , True
'set up unique UVs with name starting with RM_
oUVs = GenerateUniqueUVs (, "RM_" & name)

AddProp "RenderMap"
SetValue name & ".RenderMap.imagefilepath", "Render_Pictures\RM_" & name & ".pic"
SetInstanceDataValue , name & ".RenderMap.uvprop", "RM_" & name

SetValue name & ".polymsh.cls.Texture_Coordinates_AUTO.RM_"& name &".PolyPackUV.targresv", 512
SetValue name & ".polymsh.cls.Texture_Coordinates_AUTO.RM_"& name &".PolyPackUV.targresu", 512
SetValue name & ".RenderMap.resolutionx", "512"
SetValue name & ".RenderMap.squaretex", True

logmessage "RENDERMAP generation starts for: " & item.name & " - please wait"
RegenerateMaps name & ".RenderMap"
logmessage "RENDERMAP generation complete!"
end if
next

'change the shaders for selected objects to constants and add RM_image
for each item in list
name = item.name
if item.type = "polymsh" then
SelectObj name, , True

'bring in all rendermap clips
imfile = "Render_Pictures\RM_" & name & ".pic"

oClip = "Clips.RM_" & name & "_pic"

ApplyShader "Material\Constant", , , , siLetLocalMaterialsOverlap
CopyPaste , imfile, "TransientObjectContainer", 1
SIConnectShaderToCnxPoint oClip, ".material.Constant.color", False
SetInstanceDataValue , ".material.Constant.Image.tspace_id", "RM_" & name
end if
next
DeselectAll

end if
Exporting directx files to Dark Basic Pro from XSI


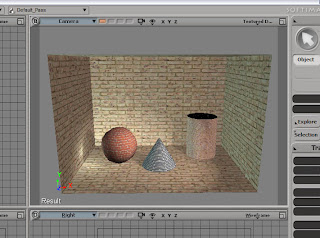
Exporting environments as direct x files to Dark Basic Pro from Softimage XSI isn't that straightforward. But perfect results are possible:-

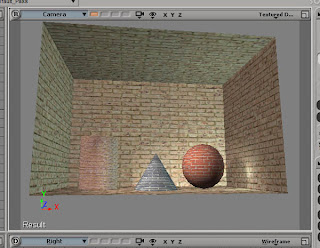
1. Make your scene, texture and lightmap as required.
2. Save the scene before continuing. Now flip the entire scene as follows:-
- create a primitive > polygon > cube
- make the cube the parent of all polygon scene elements
- scale the cubes Local Z scaling to -1 (flipping the scene) (EDIT: changed from X to Z)
- in explorer, drag all the scene objects back to the scene root
- delete the cube
- select all the scene objects and freeze all transforms


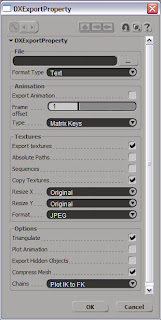
- export using the settings in the image below:


Tip1: Always export to the game directory. XSI will copy and convert all textures in the scene and place them here.
Tip2: Unless there are animated objects in the scene, uncheck export animation otherwise it will crash (and vice versa).
Tip3: Animation Type: Matrix Keys are bone based animation
Tip4: Animation Type: SRT are scale/rotate/transform animations (good for platforms)
Tip5: Complex character rigs will cause crashes. Use the simplest possible rigs for exporting.
Tip6: You can choose shrink textures or choose alternative formats.
3. You will now have a directx file and a series of .jpeg textures in your game directory.
4. Go to your art program (Photoshop or Gimp, whatever) and load up, flip horizontally and save all the scene textures.
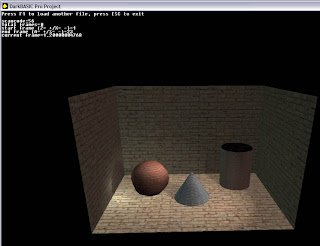
5. Go to DBPro and run your model loader code:

29 May 2007

Residential 1


Experiment with instances, architectural materials, low/fast FG settings, physical sky & sun shaders.

Posted at the XSI base forum and consequently made the front page. :)

10 May 2007

Faster 2d .Dxf importer for XSI 6+ only

Download a new plugin for importing 2d dxf info into Softimage XSI v6+ from here: download.

Posted this on XSI base on April 6th 2007. So far there hasn't been much interest so development hasn't progressed much further.

Before using: Please note that all data to be imported should be FLAT 2D CAD data. For files with line information or DXF polymeshes that are in 3 dimensions, please use the previous importer for v5. See link on the right.

VERSION NOTES:

0.1 - new compiled c# based plugin for XSI version 6+ only - imports lines, arcs and circles

Tips for workflow: XSI struggles with displaying a lot of curves on screen (I have Radeon 9800 pro), so try to reduce the curve count as much as possible. Work with snap switched on. Holding down snap (ctrl) on the keyboard results in terrible lag with big curvelists.

**Please note** - this plugin does not run in a workgroup over a network - please install on local harddrive.

POSSIBLE ADDITIONS UNDER CONSIDERATION:
- block importing (to remove the need to explode everything in a CAD program)
- seperate layer data into seperate objects
- more elements
- rewrite 3d importer in C# to evaluate performance

31 March 2007

FG & Architectural materials

This is a quick post of an arch-viz test render using Softimage XSI v6.01 and mental ray 3.5. It features hi-res textures from Arroway, the mental ray Architectural materials, zbump, physical sky and physical sun shaders and the new FG mode, multiframe (30 rays, 50 points, 0 max radius). Render time was around 20 mins with a image size of 1000x675. Some of the shadows still remain blotchy in places at these low FG settings, but it is a huge leap forward from the previous version (3.4) in terms of set up time. A little bit of post-processing was done in photoshop.

Softimage
have now released a bug-fix release of XSI v6 - v6.01. It seems more stable but i've only been using it for a few hours.

17 February 2007

News on a new Dxf importer for XSI 6

Ok. It's been a while since I posted, but the good news is that I'm
re-doing the dxf importer(for the last time) and possibly the sunpath for
XSI 6. They will only work in XSI 6 and above and will be written in C#
- a welcome new feature for XSI 6.

C# is a dream (yes microsoft can do something right!) . I've been tinkering on VS C# Express since the beginning of January and I've discovered a way to get dxf data into XSI in less time than the current script manages it.

We're talking an increase (based on a single test file) from one minute plus, down to less than 1 second!!
I've only got lines working currently, so all other elements are skipped. Expect the final version to be a little slower... Well, maybe a couple of seconds slower... :)

For a start, I've dropped the dotXSI format and opted for a conversion to EPS; the XSI EPS import option is faster and brings in curvebased drawings as a single entity. This speeds up importing AND displays in the viewport much faster that 10,000 seperate curves.

There are no import options now, just file selection. If you want to change the scale, just select the curvelist and type a new scale into the SRT.

If you need to import 3d, use the old plugin, as it isn't too slow with polymesh.