redmotion

12 March 2010

Softimage 2011 Preview

Softimage 2011 announced with ICE kinematics fully realised. It enables the intricacies of a rig to be contained (including the IK system) entirely within an ICE tree making it incredibly easy to transfer ICE rigs between different rigs and characters. THIS is a big advance and will really help all areas of rigging including rigs in videogames, a field which ICE has been criticised in the past for not being that useful.

There is also a new system for using/building Mental Ray shaders. Now you only need the source code and Softimage compiles it into a shader for you, automatically creating a SPDL and material node entry in the render tree, exposing all the parameters and allowing you to get on with it without the pain of having to seperately compile on specific platforms. As a result, over a hundred shaders that have (up until now) never been exposed in XSI, are now there. Including a IES/photometric light shader and all the features lighting shaders have gained since it was introduced as the built in renderer.
Face Robot has been updated to include automatic lip syncing. The main issue with Face robot in previous versions was that to use it in any meaningful way you needed to capture live performances and import the data. Many users (like me) don't have access to luxuries like performance capture systems. Now you just need the audio and you can generate the proper mouth movements for dialogue, reducing the lip syncing to a few tweaks. EDIT:  After seeing the GDC'10 presentation by the charismatic Mark Schoennagel, he pointed out a neat trick where you can lip sync to music tracks by singing the song yourself, generate the face robot lip sync from your take and then replace your voice with the original score. Sometimes with amusing results!
The Physx-based physics core in XSI has fallen behind in recent years but now it has recieved a full update to the latest version. Integrated into ICE with CUDA driven (nvidia GPU only) GPU acceleration, it apparently offers softbodies, full shape collisions with rigid bodies and more, all accessible from ICE.

Other stuff includes multiple camera rendering, render slate (which allows you to add text onto renders for play blasts, etc. Be nice to see render times on this.) UV unfold command gets some changes to speed up workflow including symmetry and the ability to reunfold individual islands instead of being forced to unfold and pack the entire object each time.

Pretty solid update for just 6 months work. The Softimage guys really do know what is needed and always surprise me. Of course, there is stuff I wish was in there but isn't yet (perhaps never will be) but I'm pretty sure this 6 month release will mean that Softimage 2012 could get at least a full years development. Then again maybe Autodesk are considering a major x.5 point release for all 3d applications in another six months, that only subscribers can benefit from (just to keep us locked into the subscription cycle.)

Lastly, the two seperate versions of Softimage and Softimage Advanced have vanished. There is now just one version of the software. It has 5 batch licenses for mental ray and comes as either a standalone or a network license (EDIT: no batch licenses with standalone version - thanks for the heads up, Stephen). I'm not sure how people with SI 2010 (not advanced) will upgrade or subscribe as of yet.

Just have to wait and see, I guess. Apparently, early April is predicted for release.

10 March 2010

The Bendy One


The Bendy One from Jason Wells on Vimeo.

This was a speed test using an old project and some newish techniques I've gained. It was composited in XSI using the FX tree. I used my RM_Architectural compound to generate the seperate diffuse (albedo), specular and reflective, etc passes via channels. I used fast radiosity technique to generate indirect illumination from a blurred HDR map (frame rendertime less than 20 secs). I baked an Ambient Occlusion pass as a texture using rendermap and reduced the render speed of each 1270x720 frame to 2 seconds. The longest part for rendering was the glossy floor reflection which I reduced by limiting the reflective area with a weight map.

I used a radial gradient in FX tree to create a vignetting effect and blurred some duplicates of the specular pass to get glows on the highlights. I'll try to do some tests with DOF and motion vector driven motion blur next.

09 February 2010

The Third & The Seventh

I've got to say this is probably the most incredible archviz/CGI moving imagery I've ever seen. God knows how long this took to render!

The Third & The Seventh from Alex Roman on Vimeo.


Compositing Breakdown (T&S) from Alex Roman on Vimeo.

24 January 2010

January 2010 - Softimage & stuff

Yep. Another year has started! Seemed to start a little slowly but its seems to be gathering pace now. Notable things that appeared end of last year and this year are (in no particular order):-

Monophyl - A very good new blog, full of interesting stuff including lots Softimage/ICE info and links. (Including links to all the studios currently using XSI)

Six Birds Rigging Tools -  Helge Mathee and co @ Six Birds Productions have released some excellent rigging tools in the form of a new python plugin. Includes fully features springs, new stretchy IK bones and other such delights!

LEAP - A short film by Dan Gaud - another talented XSI guy who does everything including directing, photography, production, special FX and colour grading. Direct link to movie here.

Redi-vivus - recently came back online with new tutorials for download. Unfortunately, the download and online sections are down at the moment but it should be back soon.

Tessendorf Ocean Waves - plugin got an update - awesome FREE ICE plugin that does spectacular ocean surfaces. If you're computer is up to it, of course!


Procedural City Engine Video - This has buildings generated procedurally INSIDE as well as outside. Finally someone could remake Damocles for the 21st Century or Elite for that matter.


EDIT: Alive - Creature Rigging Solution for XSI - Hot off the press - a custom character rigging solution plug in has just been posted by MerlinDigitalArt. His blog will be in the bloglist further down this page.


As for me, I started working back at my old employer and I'm storming on with prop art for the Black Mesa Source mod Which, although we had to announce that it wasn't coming out at the end of 2009, it's still going strong, don't have any doubt about that. Our announcement made the usual websites like Kotaku and some more unexpected ones like Wired magazines vaporware 2009 awards! (It got 4th place which we thought was REALLY cool.)


We also recently upgraded the website and it now has a new wiki and a new main website. Also, check out the fun at the lively Black mesa forums.

07 November 2009

Kill It Kid

I don't care - this has nothing to do with CGI, Softimage or my stuff but I'm going to plug 'em anyway. I love their music and I've seen them live 3 times at various places in London (and wished them luck in person on the day they got signed to One Little Indian records). Their music is beautiful and I think they're getting some momentum this year with the release of their debut album and I hope they make it big. They deserve to, their song writing is amazing.

Myspace
Twitter
Buy their album here  or here or here or somewhere else!


31 October 2009

Unity is now FREE

I've been looking into Unity recently and was seriously considering purchasing the Indie version, primarily because of its ability to run in a browser, but also because projects can be deployed easily to PC, Mac, Wii and even i-phone. And now with the release of version 2.6, it's been announced that the Indie version is now FREE to use. (The indie version was a cheaper stripped down version with a commercial license.)

Unity also features an excellent asset pipeline integration. While many engines make getting art assets into them a real pain, Unity works well. Assets are exported to project folders and unity converts them for you. Updating everything so you can focus on scripting, art and level design. It even has a well integrated physics engine and level/terrain editor. Even the documentation is pretty good.

With this announcement, its certainly the best low budget 3d game engine on the market and definitely worth a look.

24 October 2009

Alternative to bevel

I say don't use the bevel. At all. Instead:

1. Press plus (numpad "+") to work in subdivision mode from the get go. (Times 2 if your computer can cope with it).

2. For the working viewport, go to the Camera Visibility (shift + S) > Attributes tab and turn on Polymesh hulls

3. Goto shaded mode.


4. Use split edge to create tighter edges on the subdivided mesh.

5. What defines the sharpness of the sub-d models edge is the distance the second edge or "inner" edge is to outer edge. So in the image above you can see that in the lower viewport, the left side has a second/inner edge causing a tighter curve while the right side is much softer.

6. With this technique using inset on an single polygon can have a similar result as using bevel. However, I recommend just using split edge and subdivide edges evenly.

Softimage 2010 SP1: dxfimporter and sunposition updated

Get the v2010 SP1 compiles of the:

DXFimporter plugins here

Sunposition plugins here

10 October 2009

RTCompound: Architectural Framebuffers Compound


This is a rendertree compound that splits up the Architectural Shader over ALL the framebuffer channels. Something similar has been done but I thought I'd try it myself anyway.

What I've also done is created a couple of simple scripts that set up ALL the required channels so that all you need to do is plug in the RM_Architectural Splitter and hook it up like a normal mia_architecture node and your ready to render out a pass on floating point or non-floating point channels.

Lastly, I've left the names of the mia parameters as they are so its easier to cross reference with the param names in Mental Images Architectural Shaders manual.

Download here.


04 October 2009

Convex collision mesh creation with Stanhull/Softimage

I use a number of scripts for speeding up the creation of collision boxes for Valves SMD exporter in Softimage. The process I follow is laid out below:

First you will need to download this file. Its called Stanhull. It's a simple program that spits out an obj file containing a convex mesh based on an input mesh (inside an .obj file). Extract and place in a folder of your choice. If you don't want to edit the script below use the path: C:\3d\Stanhull\ 

1. Create your physbox model components. I do this by breaking up the original model into roughly convex forms. You are limited to the number of these by default (to 16 I think) but you can overide the limit with a line in your .qc file. The $maxconvexpieces QC command can increase this.

2. Select the new convex model pieces and run the convex script:
    'Objdir = the directory you want the exported Obj to go to (change if you wish)
        Objdir = "C:\3d\Stanhull\"
        'StanhullDir = the directory you have put stanhull.exe in (change if you wish)
        StanhullDir = "C:\3d\Stanhull\"
        'NOTE: file is always created in the Softimage\version xx\Application\bin dir and always called hull.obj
        fileOutLoc = Application.InstallationPath( siFactoryPath ) & "\Application\bin\hull.obj"
      
        set list = GetValue( "SelectionList" )
        if list.count = 0 then
               MsgBox "Please select at least one polymesh object first!!"
               else
               for each item in list
                  logmessage item.name
                  name = item.name
                  if item.type = "polymsh" then
                      'select objects one by one and export
                     SelectObj name, , True
                     getObjname = Objdir & "convert.obj"
                     ObjExport getObjname, , , , , , , , , , 0, False, , , False
                     'set up s.ystem command to run Stanhull.exe
                     cmd = StanhullDir & "StanHull " & getObjname & " -t"   
                     cmdResult = s.ystem( cmd )
                     set inObj = ObjImport( fileOutLoc, 1, 0, True, True, False, True )
                     'select new object and set up geometry approximation as needed for .phy SMDs
                     SelectObj inObj, , True
                     MakeLocal inObj & ".geomapprox", siDefaultPropagation
                     SetValue inObj & ".geomapprox.gapproxmoad", False
                     CreateProjection , siTxtCubic, siTxtDefaultCubic, , "Texture_Projection"
                     FreezeModeling
                     end if
                 next
            end if


3. Now with the new convex imported back in, select them and remove automatic discontinuity from them all with the following script:
dim name
set list = GetValue( "SelectionList" )
if list.count = 0 then
   MsgBox "Please select at least one polymesh object first!!"
   else
'start rendermap make routine - depending on scene size and object complexity this could take a while... :)
   for each item in list
      logmessage item.name
      name = item.name
      if item.type = "polymsh" then
         SelectObj name, , True
         MakeLocal ".geomapprox", siDefaultPropagation
         SetValue ".geomapprox.gapproxmoad", False
         end if
      next
end if

4. Lastly, I apply cubic UVs to all of the physics box objects by selecting them and running this script (below). Once frozen, they are ready for exporting as SMD files for compiling.
dim name
set list = GetValue( "SelectionList" )
if list.count = 0 then
   MsgBox "Please select at least one polymesh object first!!"
else
'start rendermap make routine - depending on scene size and object complexity this could take a while... :)
   for each item in list
      logmessage item.name
      name = item.name
      if item.type = "polymsh" then
         SelectObj name, , True
         CreateProjection , siTxtCubic, siTxtDefaultCubic, , "Texture_Projection"
         end if
      next
end if

freeze ALL. (You may need to add an image to the material).

03 October 2009

New Ultimapper Options in Softimage 2010


Softimage 2010 has new Ultimapper options: now supporting the creation of bent normal maps, plus the full arrange of Ambient Occlusion shader options.

I did a quick test to see the differences between the available settings. The above image shows the resultant maps from the 4 combinations of options and on the image below how they look applied to the low resolution object in Open GL preview.


In this case, bent normals seem a lot smoother while the binormals map seems to result in a closer approximation from hi to low res sources in this case. The drawback with bent normals is they render twice as slow. However, I'm pretty sure that there is a case for each of these solutions out there.

24 September 2009

23 September 2009

Colorspace/Physically correct colours in Softimage

I've noticed two blogs recently post tips on how to get physically correct texture colours when rendering indirect illumination (and using physical sky/sun shaders)


http://harrybardak.co.uk/sRGB.htm
http://kobayashystips.blogspot.com/2009/09/linear-workflow-in-softimage.html

Further discussion, etc about here:
http://community.softimage.com/forum/autodesk-softimage/rendering/softimage-gamma/page-1/
http://www.aversis.be/tutorials/vray/essential_gamma_01.htm

Isolating individual scene objects per pass


This is a pass setup I came up with to address a question posted here.

Basically, the query was how to remove individual elements from a pass but still have their reflection appear on other objects. So, in the image above the blue sphere is rendered in the reflections of the grey sphere, but is invisible in the pass.

Basic Setup: All the materials in scene should have a raytype switch plugging into the material node and the rest of the material tree plugging into all ports of the raytype node.

Then in your new pass partition you add an overide property and add the material-Ray_Type-eye parameter to it.

Press 7 with the overide selected and plug a constant shader with 0 for everything including Alpha into the overide node.

You can then drag and drop any objects you like into the "hide" partition and have them not rendered in primary but still appearing in reflections without having to tweak all their rendertrees seperately.

RENDERCHANNNEL alternative

Of course, this still leaves the guy who asked the question with 70 individual passes, so a setup using renderchannels must be preferable:

For every single material you can add a Store Color in channel node between the material node and the material tree and create a new render channel with a name like "blue". Then in the render region pick the channel.

In render manager > pass > Output - add all the new channels to the Render Channels Output list. The advantage is, of course that each individual renderchannel image gets rendered during a single pass.

With a combination of both methods you can break down the scene into its seperate parts by rendering a single multi-channel pass and then create passes as needed to isolate and re-render material changes as required.


18 September 2009

dxf importer 2010

I've recompiled the dxfimporter 23 & 3d for Softimage 2010.
Get them from the usual place, here.

06 September 2009

Bot Walk 2


Slightly different take on the bot walk. From scratch again, this time I tried to match the rig motion with foot motion, so it travels forwards and the feet sit on the ground. Again, only 29 frames...

05 September 2009

Bot Walk 1


My second go at creating a walk cycle using a premade, free to use character rig from www.creativecrash.com (formerly known as highend3d.com)

29 August 2009

Architectural modeling tools

Archtools for Softimage demostration from Jason Wells on Vimeo.


V2 released

-Cameras-
Fixed Polygon Cam (new) - create a view perpendicular to an arbitary polygon

-primitives-
Draw and size Cube, Box, Cylinder, Sphere, Cone, etc standard primitives in viewport

-transform tools-
4 point rotate
2 point transform
3 point scale
mirror about 2 points (new)
align objects by 2 polygons (new)
align object - polygon to edge (new)
aligh object to polygon (new)

Limitations: these do not work correctly on enveloped meshes unfortunately.

-measuring property-
Apply to scene root and measure distances - automatically converted to scales like mm, cm.

Download from here

02 August 2009

New Archviz Website


Just set up a new Archviz website. I've tried to keep it simple.

You can find it here.

09 June 2009

New IES Light plugin


wombat778 is currently letting people test his new IES light plugin for Softimage at xsibase here.

I've not tried it yet but it looks promising.

New Softimage Community Forum

Since Autodesk's "The Area" took over from the SI community website, it seems that people are pretty unhappy about using the site - it is, afterall, pretty horrible to look at and a nightmare to navigate.

Anyway, while I think it was initially established as a backlash to "The Area", a new Softimage Community forum is now thriving. It's simple and easy to use (like the old one) and it can be found here: http://www.si-community.com/community/index.php

It seems to be thriving already. Sign up! It needs the support!

I've posted my dxf importer plug-in here for download in the Download > Plugins area:
 

07 June 2009

dxf importer plugin now at The Area

Due to the sad assimilation of community.softimage into the Autodesk discussion boards, I've re- uploaded the dxf importer addons to their downloads section here.


24 May 2009

Environment Art Portfolio site now up!

I've got my game art portfolio up online now - check it out here: link

I have extensive experience using Valve's source engine and some experience using the cryengine2 and unreal3 engines  (the image above is taken from the cryengine2 sandbox editor).

(If you can't view the portfolio site for any reason, please let me know. Thanks.)

12 May 2009

Cloudwright plug-in Open Alpha

This great new plug-in has arrived as an open alpha from http://www.simul.co.uk/. You can download the installer from here: http://www.simul.co.uk/cloudwright/plugins.


What's really cool is the realtime preview from the standalone app is available in the XSI viewport by choosing the Cloudwright_directx 9 option from viewport "realtime shaders" menu. This makes previewing the overal look of the final effect amazingly fast, allowing instant feedback on most of the cloud generation parameters.


18 March 2009

dxf importer and sun position plugins updated for Softimage v7.5

Yep, to celebrate the release of Autodesk Softimage 7.5 (I still can't believe I'm writing those words :( ) I've recompiled the famous dxf import and sunpath plugins for AD's newly acquired 3d package. (Eggh!) I will continue to update this plugin until AD add these features to the program or make Softimage to expensive to upgrade - I'll release the source code in that case.

You can get the dxf importer (plus most other versions) here.

You can currently get the new sunpath plugin here. At time of writing, nothing has changed except compatability with v7.5.

20 November 2008

Happy 10th! Black Mesa Media Release Nov'08

First things first - happy 10th birthday Half Life!

Been a pretty heated 3 weeks working towards this media release, although there wasn't much need for new prop art for these shots, just some UV mapping and skinning. Some of my own work goes public for the first time in these shots.

It's been a pretty successful release and we've received a lot of attention on forums and on a couple of websites, Kotaku being the most notable -  Google "black mesa media release 12".


Prop Art by me appeared in these Nov'08 media release shots:-

Cactus furthest away (modelling/texturing)

Green Electric Equipment behind fencing to left (remake of CS:S prop) (modelling/texturing)

Electric Transformers beneath tram platform (texturing - two diffuse maps - one visible)

Impeller pumps in area beneath rocks directly left of the tower (torus shaped items) (texturing - 3 diffuse maps/one normal map, minor modelling tweaks to fit in with other props)

Rusty Pipes (top centre - some modelling and texturing)

10 October 2008

Dxf importer for XSI v6 & v7

Here is the permanent link at SI NET for my dxf import plugin for XSI 6 & 7:
As far as I'm aware they should work with x32 and x64 systems. I'd like to thank all the people that helped with general testing of the dlls at the SI NET thread:
Please use this thread or the comments box on the download page to post any issues you have regarding the plugin and I will do my best to answer them.

New ICE compounds

There seems to be a nice momentum building with v7 now.

A couple of interesting free ICE compounds have been announced recently:

Eric Moootz's emNewton

He also assures me that he is currently working on an ICE node for his emFluids
plugin. I think he will get a much better take up with this.

Guillaume Laforge's Procedural fluid flow

Thiago's Function graph node

And the first commercial one I've seen: Gerstner Waves


19 August 2008

Pigeon Impossible


...is a short animated film directed by Lucas Martell. You can see the website here , his excellent blog here or subscribe to the podcast (all full of good advanced animation/character rigging/animation tips for XSI) here.

I wish him all the luck in the world in making the project a success.


09 August 2008

XSI 7 shipping! Redmotion plugins do not work in v7 yet

XSI 7 shipped last week. (There is currently a 'do not disturb' sign on my door)

I've evaluated all the current redmotion compiled plugins. None of which actually load into v7. I will upgrade to v7 very soon and update all the plugins at some point. The best workaround currently is to continue to import dxf files into XSI 6 and then open the saved scene file in v7.

02 August 2008

Fluids with Ice? (XSI 7)


metaball animation XSI v6 from Jason Wells on Vimeo.

People keep asking whether fluids will be possible with ICE in XSI 7. I think they will, but perhaps not right away. Why? Because stuff like this (video above) is already possible. This is half the battle. The other half is getting the particles to behave correctly. This is sure to be an ICE compound sooner or later.

28 April 2008

Morgan Cheetham Chair Visuals


These images are based on a furniture design by a work colleague of mine, Sam Cocker. You can find more info at his website - http://www.morgancheetham.co.uk/. Its been something bubbling under for a few months but I'm quite pleased with how they've turned out so far.(HDRI added to all objects with environment node, FG, AO shader on camera, architectural shaders, XSI 6.02 FND - rendertimes about 15 and 20mins at 2000x1500pixels).

EDIT : 30-04-08 - updated to show correct rear feet.

09 March 2008

Redmotion plugin development update

red_Dxfimporter goes 3d (again)
Finally got around to redoing my old vbscript as a C# dll (something long overdue). This time there will be more useful import options plus each dxf layer will be assigned a seperate, appropriately named material. (Image below shows 8000+ individual polygon cubes on five seperate layers imported in about a minute.). I've noticed that there are memory issues in importing huge DXF scenes (my computer crashed out after reaching the 2 gb limit) using the dotXSI format and I'm looking at some work arounds (each layer is loaded as a seperate dotXSI file).

I'm mulling over some improvements for the 2d plugin as well.


red_Archtools

Been developing quite a few new extras for the Archtools plugin including some tweaks to the existing toolset (all these are hacks are possible using sequences of existing XSI commands but the procedures are scripted to speed things up):

Primitive > Camera > Fixed Polygon Camera ( creates a standard orthographic camera locked exactly perpendicular/parallel to a selected polygon - helps with the accurate and fast trimming of meshes.)

Trim trim away.. (Use the knife tool to cut polygons accurately \/ )


Get > Property > Measure (this is a modification of Isner's original measuring tool but it gives you the option to copy-paste a measurement to another place (perhaps the windows calculator) and also to set a scale (SI units to mm) so that the readout can be displayed in equivalent units (like mm,  cm, etc.) Its applied to the scene root as a property.


Transform > Transform by 2 points (move a object by snapping two points: start position and end point only. No need to go through the whole moving centre routine everytime.)
Transform > Scale by 3 points (unchanged)
Transform > Align to Polygon (align an object (position and rotation) to the centre of a polygon witha few clicks)

Transform > Mirror by 2 points (this is a classic cad tool. It  mirrors an object over an arbitary line)
Transform > Rotate by 4 points (precision rotation of multiple objects - same as before)
Transform > Align to edge (similar to Align to polygon but moves and rotates an object to an edge)
Edit > Instances on a curve  (Will include this - its handy - see post below)

(May tweak these commands listed below)
Primitive >Polygon mesh > Draw Box
Primitive >Polygon mesh > Draw Cone
Primitive >Polygon mesh > Draw Cube
Primitive >Polygon mesh > Draw Cylinder
Primitive >Polygon mesh > Draw Sphere

red_SunPosition

I'm in process of TRYING to update the plugin to read a text file into which you can place cities, locations of your choice and select them through the sunpath interface to get the correct longitude, latitude, timezone, etc. I've tried this before and but have had technical problems with the combobox.

28 February 2008

Sunpath tutorial video


This is a quick video to demostrate the Sun Position plugin in use. Download from here.

23 February 2008

Instance on a curve (XSI)


This is command primarily for doing balustrades quickly. Although, I guess it could have other uses...

1. Create a model from the baluster item you wish to use.

2. Run the command with: Right hand EDIT > Instances on curve

3. Select the model and then the curve.

4. An options dialogue will appear. The number of instances evenly placed on the curve is determined with a slider and their tangency by checking one or more checkboxes. (eg: how they relate to the curve)

In the image, "X" tangent was used.

Get it here.

02 December 2007

Archtools for XSI


This is a plugin with a number of little tools for modelling with more precision:

Draw Box, Draw Cone, Draw Cube, Draw Cylinder and Draw Sphere enable the user to pick 2-3 points to define the size, position (and rotation in some cases) of the standard polygon primitives. Draw box requires 3 points (corner point, length, width) , the others two (centrepoint then size).
The two transform tools mimic common cad tools: the 3 point rotate and the 3 point scale.
1. Select an object or or number of them.
(Use CTRL to snap to elements, Left-click to select all points.)
2. Pick the origin about which the scale or rotation will be done.
3. Pick the reference point (usually on the object to be transformed) that will be used for scaling/rotation
4. In the case of the rotation, pick a point which defines the axis of rotation.
5. Finally, pick the new position for the reference point. Right-click to exit when finished.


Click on this thumbnail to see 4 point rotate in action.

EDIT: (link updated. - download and replace file from .txt to .xsiddon) here.

15 November 2007

Black Mesa: Source

At the mo' I'm just pushing forwards with some prop skins for Black Mesa: Source. Thought I'd link to this image at moddb which shows my DNA texture sitting in the foreground.

Rapidcore 001

02 November 2007

Sunpath plugin - alternative download

If you are having trouble getting sunpath plugin to run you can get a non-xsiaddon version from the link below. It also contains instructions on how to install the plugins manually and usage tips.

http://files-upload.com/333993/SunPosition-beta0.2-26-06-07.zip.html

07 September 2007

IES Lights in XSI

This is something I posted at XSIbase on June 8, 2007, I'm putting it here for ease of finding:


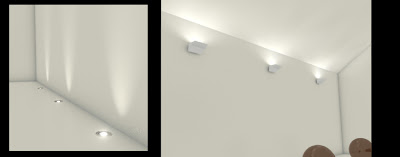
I started playing around with the IES plugin for Softimage XSI from Ctrl studio called ctrl.light profile and wanted to establish a workflow that yealded some good results. (see link to original post for download: http://forums.cgsociety.org/showthread.php?f=24&t=300617&page=1&pp=15)

Anyway, Ctrl.light profile does seem to display a reasonably accurate visual appearence of a luminaire, if used correctly:-

To get a hold on how to use the plugin do the following:-

1. Firstly: find a light fitting that you know about, it helps to have
photographs of it installed and working. I chose some uplighters from Erco;
(Erco are good because provide both 3d meshes and IES data for all their
products as well as comprehensive brochures.)

2. Then: Get > Primitive > Geoshader and add the plugin to the
Geoshader.

3. Import the appropriate IES data into the IES filename section.

4. Create a point light. Important: Reduce the intensity of the point light
you are going to use as an IES to 0
or you will not get a correct result - you'll end up getting light from the pointlight as well as the IES shader (which is extra bad if you are using GI or/and FG.)

5. In the light part of the plugins ppg attach the new point light.

6. Now do a test render of the light positioned near a surface and go
forward from there.

7. Important: DON'T rotate the point light. After all, there is no logical reason to. IES data for an uplighter will automatically cast light upwards, a downlighter will always cast light downwards. Just placing the pointlight above or below a specific light (depending on the type) is all you need to do.


Finally, if you need more than one light of the same type, use Instances. Create a model from the light mesh object (if used), point light and geoshader, then instance them around the scene - Works well.